Blogger- 選單小工具

接下來,>> 點選編輯HTML >> 進入 XML編輯器

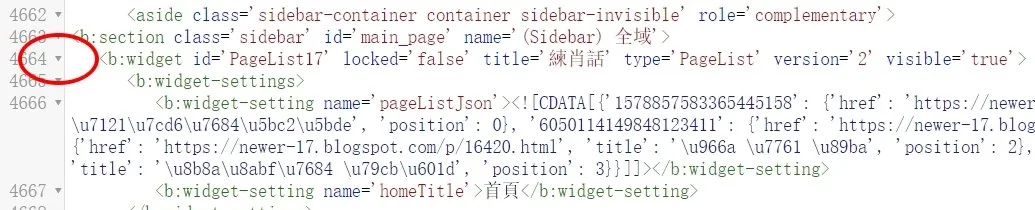
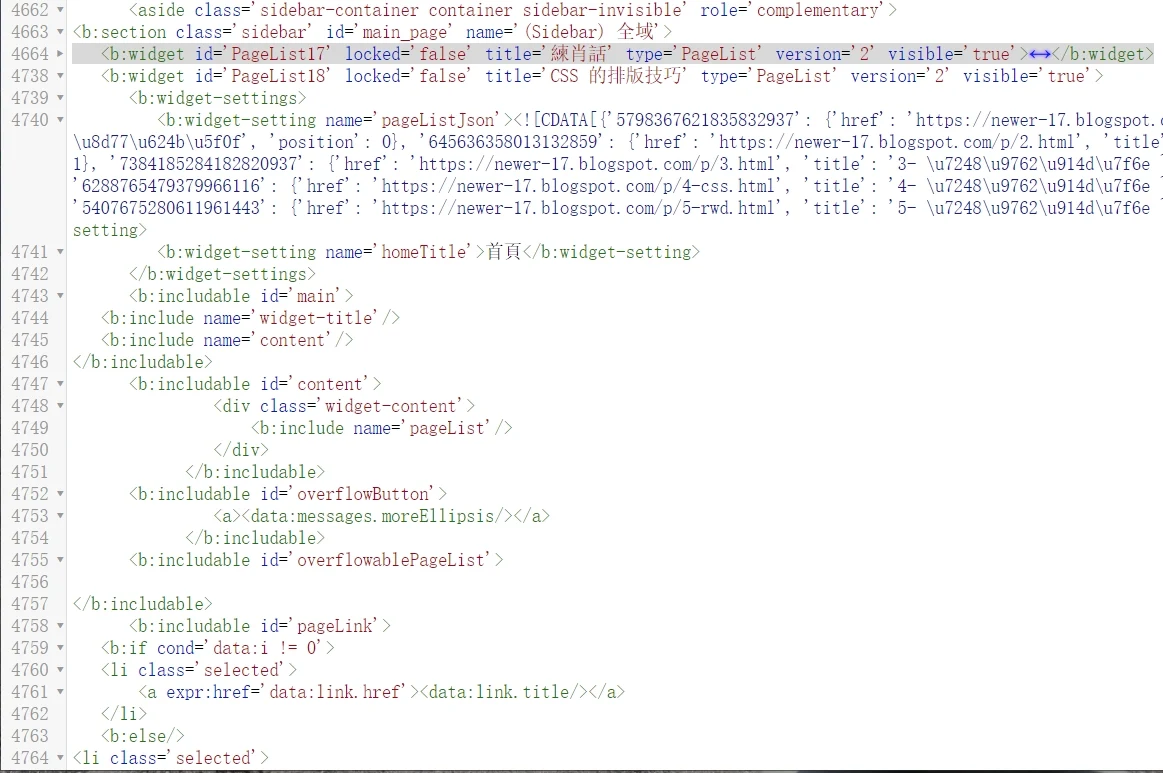
點按、在XML編輯器 右上角的跳到小工具

點按下面的 Code 複製 HTML碼:
<b:widget id='LinkList17' locked='false' title='特效選單❤️'
type='LinkList' version='2' visible='true'>
<b:includable id='main'>
<b:include name='widget-title'/>
<b:include name='content'/>
<b:include name='style'/>
</b:includable>
<b:includable id='content'>
<div class='widget-content'>
<ul>
<b:loop values='data:links' var='link'>
<li><a expr:href='data:link.target'>
<b:attr cond='data:link.target contains "#"'
name='target' value='_blank'/>
<data:link.name/></a></li>
</b:loop>
</ul>
</div>
</b:includable>
<b:includable id='style'>
<style type='text/css'>
.LinkList {
display: inline-block;
border: 1px solid #888;
perspective: 160px;
cursor:pointer;
}
.LinkList h5{
background: white;
padding:2px 10px;
margin:0;
line-height:1.5;
}
.LinkList ul{
background:
linear-gradient(-50deg, #fffaa0, #f63);
padding:6px 0;
z-index: 100;
list-style: none;
box-shadow:1px 2px 8px rgba(50,50,50,0.6);
margin:1px 0;
position: absolute;
transition:opacity .8s, transform .6s cubic-bezier(.25, 1, .8,
1.1);
opacity:0; transform: rotateX(-80deg);
transform-origin: 0 0;
white-space: nowrap;
}
.LinkList:hover ul{ opacity:1; transform:
rotateX(8deg);}
.LinkList ul li:hover {
background:rgba(250,250,250,0.7);
border-left-color:red; box-shadow:1px 2px 3px rgba(30,30,30,0.6);}
.LinkList ul li A{ color:black; color:#666; text-shadow:1px 1px
white;}
.LinkList ul li{
color:#666; text-shadow:1px 1px
white;
border:3px solid transparent;
padding:5px 12px;
transition:.5s;}
</style>
</b:widget>
點按下面的 Code 複製 翻牌選單:
<b:widget id='LinkList17' locked='false' title='特效選單❤️'
type='LinkList' version='2' visible='true'>
<b:includable
id='main'>
<b:include name='widget-title'/>
<b:include
name='content'/>
<b:include name='style'/>
</b:includable>
<b:includable
id='content'>
<div class='widget-content'>
<ul>
<b:loop
values='data:links' var='link'>
<li><a
expr:href='data:link.target'>
<b:attr cond='data:link.target contains "#"'
name='target' value='_blank'/>
<data:link.name/></a></li>
</b:loop>
</ul>
</div>
</b:includable>
<b:includable
id='style'>
<style type='text/css'>
.LinkList {
display: inline-block;
border: 1px solid #888;
cursor:pointer;
}
.LinkList h5{
background:
white;
padding:2px 10px;
margin:0;
line-height:1.5;
}
.LinkList
.widget-content{transform:scale(0)}
.LinkList:hover
.widget-content{transform:scale(1)}
.LinkList ul{
background:
linear-gradient(45deg, #aaa, #fff,#ddd);
padding:6px 0;
list-style: none;
z-index: 100;
box-shadow:1px 2px 8px rgba(50,50,50,0.6);
margin:1px 0;
position: absolute;
transition:opacity .8s, transform .8s;
opacity:0; transform: rotateY(-160deg);
white-space: nowrap;
border-radius:8px;
}
.LinkList:hover ul{ opacity:1; transform:
rotateY(0deg);transition-delay: 0.2s;}
.LinkList ul li:hover { background:rgba(250,250,250,0.7);
border-left-color:red; box-shadow:1px 2px 3px rgba(30,30,30,0.6);}
.LinkList ul li A{ color:black; }
.LinkList ul li{
border:3px solid transparent;
padding:5px 12px;
transition:.5s;}
</style></b:includable>
</b:widget>
點按下面的 Code 複製 關門選單:
<b:widget id='LinkList17' locked='false' title='特效選單❤️'
type='LinkList' version='2' visible='true'>
<b:includable
id='main'>
<b:include name='widget-title'/>
<b:include
name='content'/>
<b:include name='style'/>
</b:includable>
<b:includable
id='content'>
<div class='widget-content'>
<ul>
<b:loop
values='data:links' var='link'>
<li><a
expr:href='data:link.target'>
<b:attr cond='data:link.target contains "#"'
name='target' value='_blank'/>
<data:link.name/></a></li>
</b:loop>
</ul>
</div>
</b:includable>
<b:includable
id='style'>
<style type='text/css'>
.LinkList {
display: inline-block;
border: 1px solid #888;
cursor:pointer;
}
.LinkList h5{
background:white;
padding:2px 10px;
margin:0;
line-height:1.5;
}
.LinkList
.widget-content{transform:scale(0)}
.LinkList:hover
.widget-content{transform:scale(1)}
.LinkList ul{
background:
linear-gradient(45deg, #aaa, #fff,#ddd);
padding:6px 0;
z-index: 100;
list-style: none;
box-shadow:1px 2px 8px rgba(50,50,50,0.6);
margin:1px 0;
position: absolute;
transition:opacity .8s, transform .8s;
opacity:0; transform: rotateY(-160deg);
white-space: nowrap;
border-radius:8px;
transform-origin:0;
}
.LinkList:hover ul{ opacity:1; transform:
rotateY(0deg);transition-delay: 0.2s;}
.LinkList ul li:hover { background:rgba(250,250,250,0.7);
border-left-color:red; box-shadow:1px 2px 3px rgba(30,30,30,0.6);}
.LinkList ul li A{ color:black; }
.LinkList ul li{
border:3px solid transparent;
padding:5px 12px;
transition:.5s;}
</style></b:includable>
</b:widget>
調整選單的樣式內容 :
.LinkList h5{ 抬頭 標題
color: 文字顏色;
background: 底色;
padding: 內距; 可用來調整高度、寬度
}
.LinkList ul{ 選單主體
color: 文字顏色;
background: 底色;
padding: 內距; 可用來調整高度、寬度
}
.LinkList ul li{ 選項列
background: 底色;
padding: 內距; 可用來調整高度、寬度
}
.LinkList ul li a{ 選項
color: 文字顏色;
}
※ 在 URL 網址後面加上井字 ( # ) 符號,該連結將會以新頁框開啟
https://e-717.blogspot.com/#
https://你的部落名稱.blogspot.com/search/label/標籤#
編輯連結清單
轉到 [版面配置]窗格 ~ 打開連結清單小工具,在設置中填寫網址和網站名稱。
收合成一行時,你就可以在下一行,貼上小工具HTML碼了!!
或反白刪除、替代。
其實、在文章編輯器也有這個功能,不知道各位看倌是否有注意到?
 協助架設 Blogger / 網站 服務

 舊
舊 

真的很感謝你。用小工具的html 我才能完成..真的太謝謝你了
回覆刪除回頁首有成功了╰(*°▽°*)╯ 好開心(本來為了那個想花錢買主題的)
那往上的箭頭圖片可以讓我用嗎(原來附在程式碼裏的)?或我要再學著找方法把它置換掉
謝謝你,我真的對 html 完成不懂..只會用簡單的
我只是隨便拿一張圖,來做範例,圖片你若嘎意,就留著用啊! [Qz::1520435742-3098445709.png] 成功
刪除[Qz::1520435774-1580599554.png]
刪除不好意思再請問一下 那html小工具拉到哪個區塊,會影響執行嗎?
刪除如側邊欄或精選文章上方
不會啦~[Qz::1548831521-3286358025.gif]
刪除